Featured
Mastering EKS scaling with Karpenter: A practical guide
Medium Non-Members can read the full story HERE!

Introduction
Efficiently scaling Kubernetes clusters is crucial for optimizing both performance and cost in modern cloud infrastructure. I’ve seen firsthand how traditional scaling approaches often lead to inefficient resource utilization, slow scaling response times, and complex management overhead. After working with various scaling solutions, I can confidently say that Karpenter, AWS’s open-source node autoscaler for Kubernetes, solves these challenges with a workload-driven approach that provisions the right nodes at the right time.
If you’ve ever struggled with Kubernetes scaling (and who hasn’t?), you’ll appreciate how Karpenter simplifies this process by directly provisioning EC2 instances based on workload requirements. It eliminates the need for predefined node groups and reduces scaling latency from minutes to seconds. Trust me, when you’re dealing with production traffic spikes, those minutes matter!
TL;DR
- Karpenter is a Kubernetes-native autoscaler that provisions nodes in seconds rather than minutes
- Unlike Cluster Autoscaler, Karpenter doesn’t require node groups and can automatically select the best instance types for your workloads
- You’ll learn how to configure NodePools and EC2NodeClass to optimize for different workload types, architectures, and cost models
- We’ll cover practical examples for x86, ARM/Graviton, and Spot instances with real-world deployment patterns
- The example repo at github.com/altinukshini/eks-karpenter-example provides a complete Terraform implementation you can use as a reference
Understanding Kubernetes scaling challenges
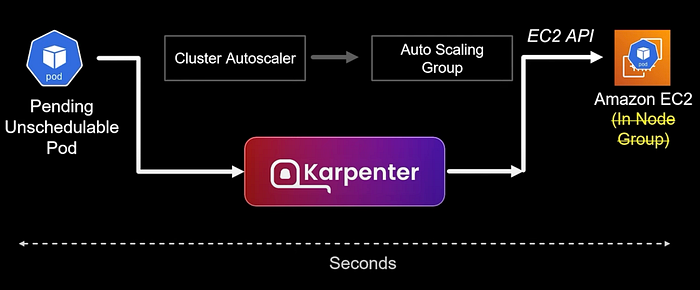
Before diving into Karpenter, let’s understand the traditional Kubernetes scaling flow:
- Your application runs in pods on worker nodes (EC2 instances)
- As traffic increases, Horizontal Pod Autoscaler (HPA) creates additional pods
- When existing nodes can’t accommodate new pods, they remain in “Pending” state
- A node autoscaler detects these pending pods and provisions new nodes
- The scheduler then places the pending pods on the newly provisioned nodes
This sounds straightforward, but I’ve encountered numerous limitations with traditional node autoscalers like Cluster Autoscaler in real-world scenarios:
The Cluster Autoscaler Approach

Cluster Autoscaler requires you to:
- Create node groups with predefined instance types
- Configure Auto Scaling Groups (ASGs) for each node group
- Manually update node groups when new instance types are needed
This creates several challenges that I’ve personally battled with:
- Node provision latency: The multi-step process (Cluster Autoscaler → ASG → EC2 API) takes minutes. I’ve watched anxiously as pending pods waited for new nodes during traffic spikes.
- Node group management overhead: You must create and manage separate node groups for different instance types. I once managed a cluster with 12 different node groups — it was a nightmare to maintain!
- Limited instance type flexibility: Each node group can only contain compatible instance types. When AWS released new, more cost-effective instance types, updating all our node groups was a tedious process.
- Resource utilization inefficiencies: Predefined node groups often lead to underutilized resources. I’ve seen clusters running at 30–40% utilization because of these limitations.
For example, if an application suddenly needs GPU instances, but your node groups only contain general-purpose instances, the GPU workload will remain pending until you manually create a new GPU node group.
What is Karpenter?
Karpenter is an efficient, open-source node autoscaler for Kubernetes that was created by AWS and donated to the Cloud Native Computing Foundation (CNCF). It’s now a CNCF project under SIG Autoscaling and has been adopted by multiple cloud providers, including Azure.
Karpenter takes a fundamentally different approach to node scaling:
- Direct EC2 provisioning: Karpenter bypasses node groups and ASGs, directly calling EC2 APIs
- Workload-driven scaling: It provisions nodes based on pod requirements rather than predefined node groups
- Automatic instance selection: Karpenter can choose from all available instance types to find the best match
- Kubernetes-native: It uses standard Kubernetes scheduling constraints and YAML configuration
Beyond just scaling, Karpenter also:
- Optimizes cost through consolidation and right-sizing
- Supports diverse workloads, including ML and generative AI
- Facilitates cluster upgrades and patching
- Integrates deeply with Kubernetes scheduling
Karpenter vs. Cluster Autoscaler: A Detailed Comparison

The key architectural difference is that Cluster Autoscaler works through Auto Scaling Groups, while Karpenter directly provisions EC2 instances in response to pending pods, dramatically reducing latency and management overhead. In my experience, this difference is game-changing for production workloads.
Setting up Karpenter on EKS
Let’s walk through setting up Karpenter on an EKS cluster. We’ll use Terraform for infrastructure as code, but the concepts apply regardless of your deployment method. The example repository at github.com/altinukshini/eks-karpenter-example provides a complete implementation that you can use as a reference.
Prerequisites
- AWS CLI configured with appropriate credentials
- kubectl installed
- An existing EKS cluster (or you can create one as part of this setup)
- Terraform (if following the IaC approach)
Installation with Terraform
First, let’s look at the Terraform module for Karpenter from the example repository:
module "karpenter" {
  source  = "terraform-aws-modules/eks/aws//modules/karpenter"
  version = "~> 20.34.0"

  cluster_name           = module.eks.cluster_name
  irsa_oidc_provider_arn = module.eks.oidc_provider_arn

  # IAM role for the Karpenter service account
  irsa_namespace_service_accounts = ["karpenter:karpenter"]
  enable_irsa                     = true

  # Create instance profile for Karpenter-provisioned nodes
  create_instance_profile = true

  # Enable spot termination handling
  enable_spot_termination = true

  # Node IAM policies
  node_iam_role_additional_policies = {
    AmazonEKSWorkerNodePolicy            = "arn:aws:iam::aws:policy/AmazonEKSWorkerNodePolicy"
    AmazonEC2ContainerRegistryReadOnly   = "arn:aws:iam::aws:policy/AmazonEC2ContainerRegistryReadOnly"
    AmazonEKS_CNI_Policy                 = "arn:aws:iam::aws:policy/AmazonEKS_CNI_Policy"
    AmazonSSMManagedInstanceCore         = "arn:aws:iam::aws:policy/AmazonSSMManagedInstanceCore"
  }
}
Next, deploy Karpenter using Helm:
resource "helm_release" "karpenter" {
  namespace        = "karpenter"
  create_namespace = true

  name       = "karpenter"
  repository = "oci://public.ecr.aws/karpenter"
  chart      = "karpenter"
  version    = "v1.3.1"  # Using the latest stable version

  values = [
    <<-EOT
    serviceAccount:
      name: ${module.karpenter.service_account}
      annotations:
        eks.amazonaws.com/role-arn: ${module.karpenter.iam_role_arn}
    settings:
      clusterName: ${module.eks.cluster_name}
      clusterEndpoint: ${module.eks.cluster_endpoint}
      interruptionQueue: ${module.karpenter.queue_name}
    controller:
      logLevel: info
      resources:
        limits:
          cpu: 1
          memory: 1Gi
        requests:
          cpu: 250m
          memory: 512Mi
    EOT
  ]
}
Using Terraform for this setup saves a ton of time and ensures consistency across environments. The first time I deployed Karpenter manually, I missed a few IAM permissions and spent hours debugging. With this approach, everything is defined as code and easily reproducible.
Manual installation with Helm
If you prefer a manual approach (maybe for a quick test or proof of concept), you can install Karpenter using Helm directly:
# Add the Karpenter Helm repository
helm repo add karpenter https://charts.karpenter.sh
helm repo update

# Install Karpenter
helm upgrade --install karpenter karpenter/karpenter \
  --namespace karpenter \
  --create-namespace \
  --set serviceAccount.annotations."eks\.amazonaws\.com/role-arn"=${KARPENTER_IAM_ROLE_ARN} \
  --set settings.clusterName=${CLUSTER_NAME} \
  --set settings.clusterEndpoint=${CLUSTER_ENDPOINT} \
  --set settings.interruptionQueue=${INTERRUPTION_QUEUE_NAME}
Configuring NodePools for different workloads
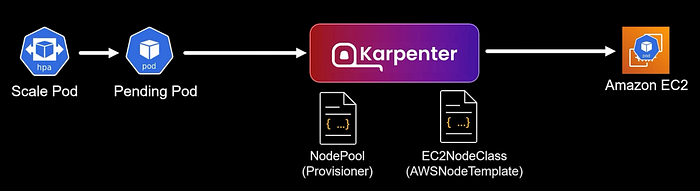
Karpenter uses two primary custom resources to control its behavior:
- NodePool: Defines what kind of nodes Karpenter will create
- EC2NodeClass: Specifies AWS-specific configuration for the nodes
Let’s look at these in detail with practical examples from the example repository.
Understanding NodePool and EC2NodeClass
The NodePool resource defines instance types, CPU architecture, capacity types, availability zones, and more.
The EC2NodeClass defines AWS-specific configuration like AMI family, subnet selection, and security groups.
Here’s a simplified example of both resources:
# NodePool example
apiVersion: karpenter.sh/v1
kind: NodePool
metadata:
  name: default-x86
spec:
  template:
    spec:
      nodeClassRef:
        kind: EC2NodeClass
        name: default
        group: karpenter.k8s.aws
      requirements:
        - key: kubernetes.io/arch
          operator: In
          values: ["amd64"]
        - key: kubernetes.io/os
          operator: In
          values: ["linux"]
        - key: karpenter.sh/capacity-type
          operator: In
          values: ["on-demand", "spot"]
        - key: node.kubernetes.io/instance-type
          operator: In
          values: ["c5.large", "c5.xlarge", "m5.large", "m5.xlarge"]
  limits:
    cpu: "1000"
    memory: "1000Gi"
  disruption:
    consolidationPolicy: WhenUnderutilized
    consolidateAfter: 30s

# EC2NodeClass example
apiVersion: karpenter.k8s.aws/v1
kind: EC2NodeClass
metadata:
  name: default
spec:
  amiFamily: AL2023
  subnetSelectorTerms:
    - tags:
        karpenter.sh/discovery: ${cluster_name}
  securityGroupSelectorTerms:
    - tags:
        karpenter.sh/discovery: ${cluster_name}
  role: ${node_role}
  blockDeviceMappings:
    - deviceName: /dev/xvda
      ebs:
        volumeSize: 20Gi
        volumeType: gp3
        deleteOnTermination: true
        encrypted: true
NodePool Docs: https://karpenter.sh/v1.3/concepts/nodepools/
EC2NodeClasses Docs: https://karpenter.sh/v1.3/concepts/nodeclasses/
In our production environment, we’ve configured multiple NodePools for different workload types. For example, we have a dedicated NodePool for our data processing workloads that use Spot instances and another for our critical services that use On-Demand instances. This separation gives us the flexibility to apply different policies to different workloads.
Kubernetes scheduling with Karpenter
Karpenter integrates deeply with Kubernetes scheduling constraints. Let’s explore how to use these constraints to control where your workloads run.
Node Selectors
The simplest way to target specific nodes is with nodeSelector:
apiVersion: apps/v1
kind: Deployment
metadata:
  name: nginx-x86
spec:
  replicas: 2
  template:
    spec:
      nodeSelector:
        kubernetes.io/arch: amd64
      containers:
      - name: nginx
        image: nginx:latest
        resources:
          requests:
            cpu: 500m
            memory: 512Mi
This deployment will only run on x86/AMD64 nodes. If no such nodes exist, Karpenter will provision them based on your NodePool configuration.
I’ve used this approach to ensure our Java applications run on x86 instances while our Go microservices run on ARM-based Graviton instances for better price performance. The beauty is that I didn’t have to create separate node groups for each architecture — Karpenter handles it all automatically.
Node Affinity and Taints
For more complex scheduling requirements, you can use nodeAffinity and taints/tolerations. These are powerful tools in your Kubernetes scheduling arsenal, and Karpenter respects them fully.
For example, we use node affinity to ensure our Spot workloads only run on Spot instances:
apiVersion: apps/v1
kind: Deployment
metadata:
  name: batch-processor
spec:
  replicas: 3
  template:
    spec:
      affinity:
        nodeAffinity:
          requiredDuringSchedulingIgnoredDuringExecution:
            nodeSelectorTerms:
            - matchExpressions:
              - key: karpenter.sh/capacity-type
                operator: In
                values:
                - spot
      containers:
      - name: processor
        image: myapp:latest
Advanced Karpenter features
Cost Optimization with Consolidation
One of my favorite Karpenter features is its ability to automatically optimize your cluster’s cost by consolidating underutilized nodes:
apiVersion: karpenter.sh/v1
kind: NodePool
metadata:
  name: default
spec:
  disruption:
    consolidationPolicy: WhenEmptyOrUnderutilized
    consolidateAfter: 30s
With this configuration, Karpenter will:
- Identify underutilized nodes
- Drain and terminate these nodes
- Move pods to more efficiently packed nodes
- Potentially provision smaller, more appropriate instances
I’ve seen this feature reduce our cluster costs by 25–30% without any manual intervention. It’s like having a cost optimization engineer working 24/7!
Interruption handling
Karpenter handles EC2 Spot instance interruptions gracefully:
apiVersion: karpenter.sh/v1
kind: NodePool
metadata:
  name: spot
spec:
  template:
    spec:
      requirements:
        - key: karpenter.sh/capacity-type
          operator: In
          values: ["spot"]
When AWS sends a Spot interruption notice:
- Karpenter receives the notification via SQS
- It cordons the affected node to prevent new pods
- It drains existing pods with a graceful termination period
- If needed, it provisions replacement capacity before the interruption
This has been a game-changer for our batch-processing workloads. Before Karpenter, we’d occasionally lose work when Spot instances were reclaimed. Now, our workloads gracefully migrate to new nodes with minimal disruption.
Real-World scaling scenarios and solutions
Let’s look at some practical examples of how to use Karpenter in real-world scenarios that I’ve encountered.
Handling daily traffic patterns
For applications with predictable traffic patterns, we use HPA combined with Karpenter:
# Morning peak traffic (8 AM - 12 PM)
apiVersion: autoscaling/v2
kind: HorizontalPodAutoscaler
metadata:
  name: web-frontend
spec:
  scaleTargetRef:
    apiVersion: apps/v1
    kind: Deployment
    name: web-frontend
  minReplicas: 20
  maxReplicas: 50
  metrics:
  - type: Resource
    resource:
      name: cpu
      target:
        type: Utilization
        averageUtilization: 70
Karpenter automatically provisions and terminates nodes as the HPA scales the deployment up and down. This has eliminated the capacity planning headaches we used to have with our customer-facing applications.
Batch processing jobs
For our nightly data processing jobs:
apiVersion: batch/v1
kind: Job
metadata:
  name: data-processing
spec:
  parallelism: 50
  template:
    spec:
      nodeSelector:
        karpenter.sh/capacity-type: spot
      containers:
      - name: processor
        image: data-processor:latest
        resources:
          requests:
            cpu: 2
            memory: 4Gi
Karpenter rapidly provisions Spot instances to handle the job and terminates them when complete. This has reduced our data processing costs by over 60% compared to our previous approach of maintaining a fixed-size node group.
Performance benchmarks
After implementing Karpenter in our production environment, we’ve seen significant improvements in several key metrics:
Scaling speed
- Cluster Autoscaler: 3–5 minutes to provision new nodes
- Karpenter: 30–60 seconds to provision new nodes
This 5–10x improvement in scaling speed means our applications experience less downtime and can handle traffic spikes more effectively.
Resource utilization
Karpenter’s improved bin packing and consolidation features lead to better resource utilization and lower costs. We’re essentially getting more compute for our dollar.
Cost efficiency
In our production deployments, Karpenter has reduced infrastructure costs by 30–40% compared to Cluster Autoscaler through:
- Better instance type selection
- Improved bin packing
- Automatic consolidation
- Spot instance usage
Cost optimization strategies with Karpenter
Spot instance usage with diverse instance types
One strategy that’s worked well for us is maximizing Spot instance usage with diverse instance types:
apiVersion: karpenter.sh/v1
kind: NodePool
metadata:
  name: spot-diverse
spec:
  template:
    spec:
      requirements:
        - key: karpenter.sh/capacity-type
          operator: In
          values: ["spot"]
        - key: node.kubernetes.io/instance-type
          operator: In
          values: [
            "m5.large", "m5.xlarge",
            "m5a.large", "m5a.xlarge",
            "m5n.large", "m5n.xlarge",
            "m6i.large", "m6i.xlarge"
          ]
Using diverse instance types increases Spot availability and reduces interruption risk.
Right-sizing workloads
Ensuring your pods have appropriate resource requests is crucial:
apiVersion: apps/v1
kind: Deployment
metadata:
  name: web-app
spec:
  template:
    spec:
      containers:
      - name: app
        resources:
          requests:
            cpu: 250m    # 1/4 CPU core
            memory: 512Mi
Accurate resource requests help Karpenter make better instance type decisions.
Best practices and lessons learned
Resource request/limit configuration
- Set accurate resource requests based on actual usage
- Use Vertical Pod Autoscaler (VPA) to help determine appropriate values
- Consider using resource limits to prevent noisy neighbor issues
NodePool design principles
- Create separate NodePools for workloads with different requirements
- Use broad instance type selections to improve availability and cost
- Implement appropriate disruption policies for each workload type
Monitoring and alerting setup
We monitor Karpenter with Prometheus and Grafana:
apiVersion: monitoring.coreos.com/v1
kind: ServiceMonitor
metadata:
  name: karpenter
  namespace: karpenter
spec:
  endpoints:
  - port: metrics
  namespaceSelector:
    matchNames:
    - karpenter
  selector:
    matchLabels:
      app.kubernetes.io/name: karpenter
Key metrics we track:
karpenter_nodes_createdkarpenter_nodes_terminatedkarpenter_pods_pendingkarpenter_provisioner_scheduling_duration_seconds
Troubleshooting common issues
- Pods stuck in pending state:
- Check that NodePool requirements match pod requirements
- Verify EC2NodeClass configuration is correct
- Look for service quota limits
2. Nodes not being consolidated:
- Ensure consolidation policy is set correctly
- Check for pods preventing consolidation (PodDisruptionBudgets)
- Verify node utilization thresholds
3. Unexpected instance types:
- Review NodePool requirements
- Check for conflicting requirements
- Verify instance type availability in your region
I once spent hours debugging why our pods weren’t scheduling, only to discover we had hit our EC2 service quota limit. Now, we proactively monitor our quotas and have alerts set up to warn us when we’re approaching limits.
Conclusion
Karpenter has transformed how we approach Kubernetes scaling at Diatom Labs. By taking a workload-driven approach and eliminating the need for node groups, it provides faster scaling, better resource utilization, and lower operational overhead.
Key takeaways from our journey:
- Karpenter scales nodes in seconds rather than minutes
- It automatically selects the best instance types for your workloads
- Cost optimization features like consolidation can reduce infrastructure costs by 30–40%
- Deep integration with Kubernetes scheduling provides flexible workload placement
Whether you’re running microservices, batch jobs, or ML workloads, Karpenter can help you optimize your EKS clusters for both performance and cost. The example repository at github.com/altinukshini/eks-karpenter-example provides a great starting point for your implementation.

